
 Intelli Docs
Set Up Your Assistant
Create an AI assistant, give it knowledge via files and web pages, and shape its voice with prompts.
Your AI assistant is the brain that replies to customers on your behalf. You teach it about your business in three ways: a prompt (its personality and rules), files (PDFs, docs), and web imports (your website pages, scraped automatically).
Create the assistant
- From the dashboard sidebar, go to Assistants.
- Make sure the right organization is selected at the top.
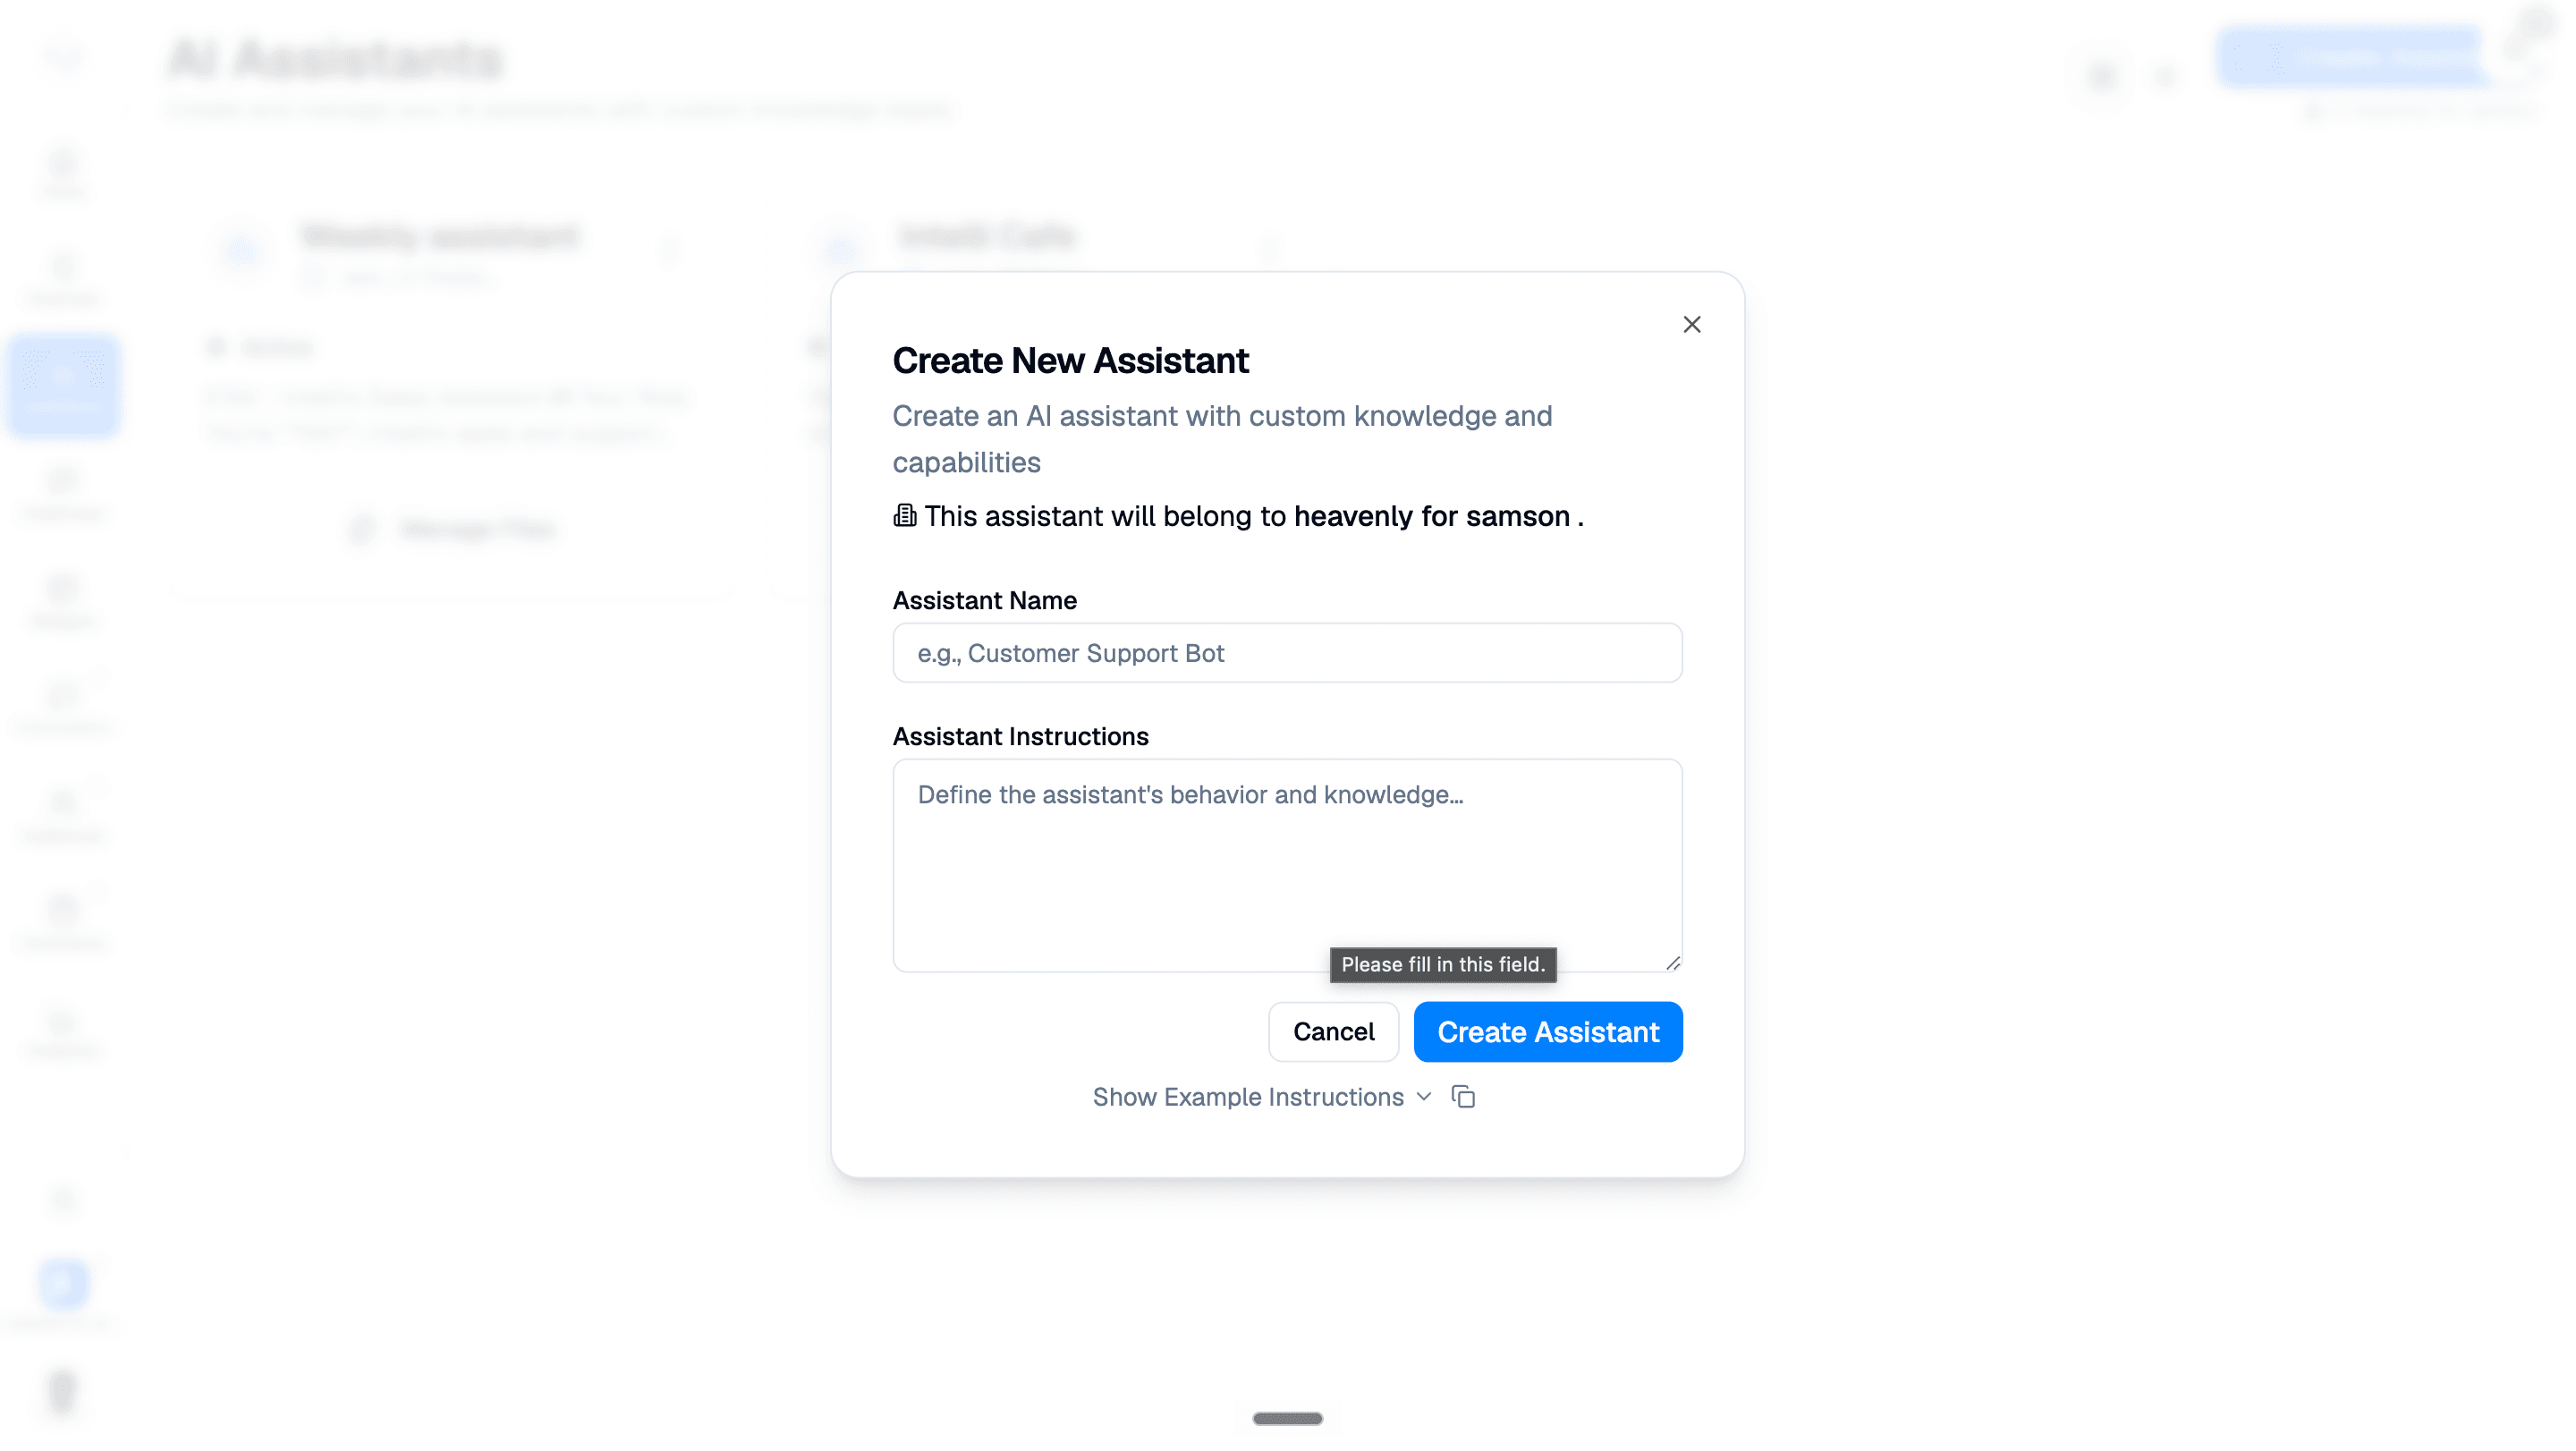
- Click Create Assistant.
- Fill in:
- Assistant Name: something descriptive (e.g. "Front-desk concierge").
- Assistant Instructions: the personality and rules. See below.
- Click Create Assistant. You'll see it appear in the list immediately.
Write a good prompt
The prompt is the most important thing you give the assistant. It shapes everything the AI says. A good prompt covers:
- Role & Core Purpose: who is this AI? (e.g. "You are the digital concierge for Heavenly Hotels, Lagos.")
- Tone & Style: formal, friendly, playful? Use first names? Emojis allowed?
- What you can help with: bookings, FAQs, menu questions, returns.
- What you can't: pricing changes, refunds over $X, medical advice. Tell it when to hand off.
- Brand rules: never say competitor names, always end with our slogan, etc.
- Handoff trigger: when to escalate to a human (e.g. "If the customer is angry or asks for a human, immediately reply 'I'll connect you with our team' and stop.").
Need a starting point?
In the Create Assistant dialog, select Show Example Instructions, then copy the example and edit it to fit your business.
Open the assistant's knowledge base
From the Assistants list, click Manage Files on the assistant card.
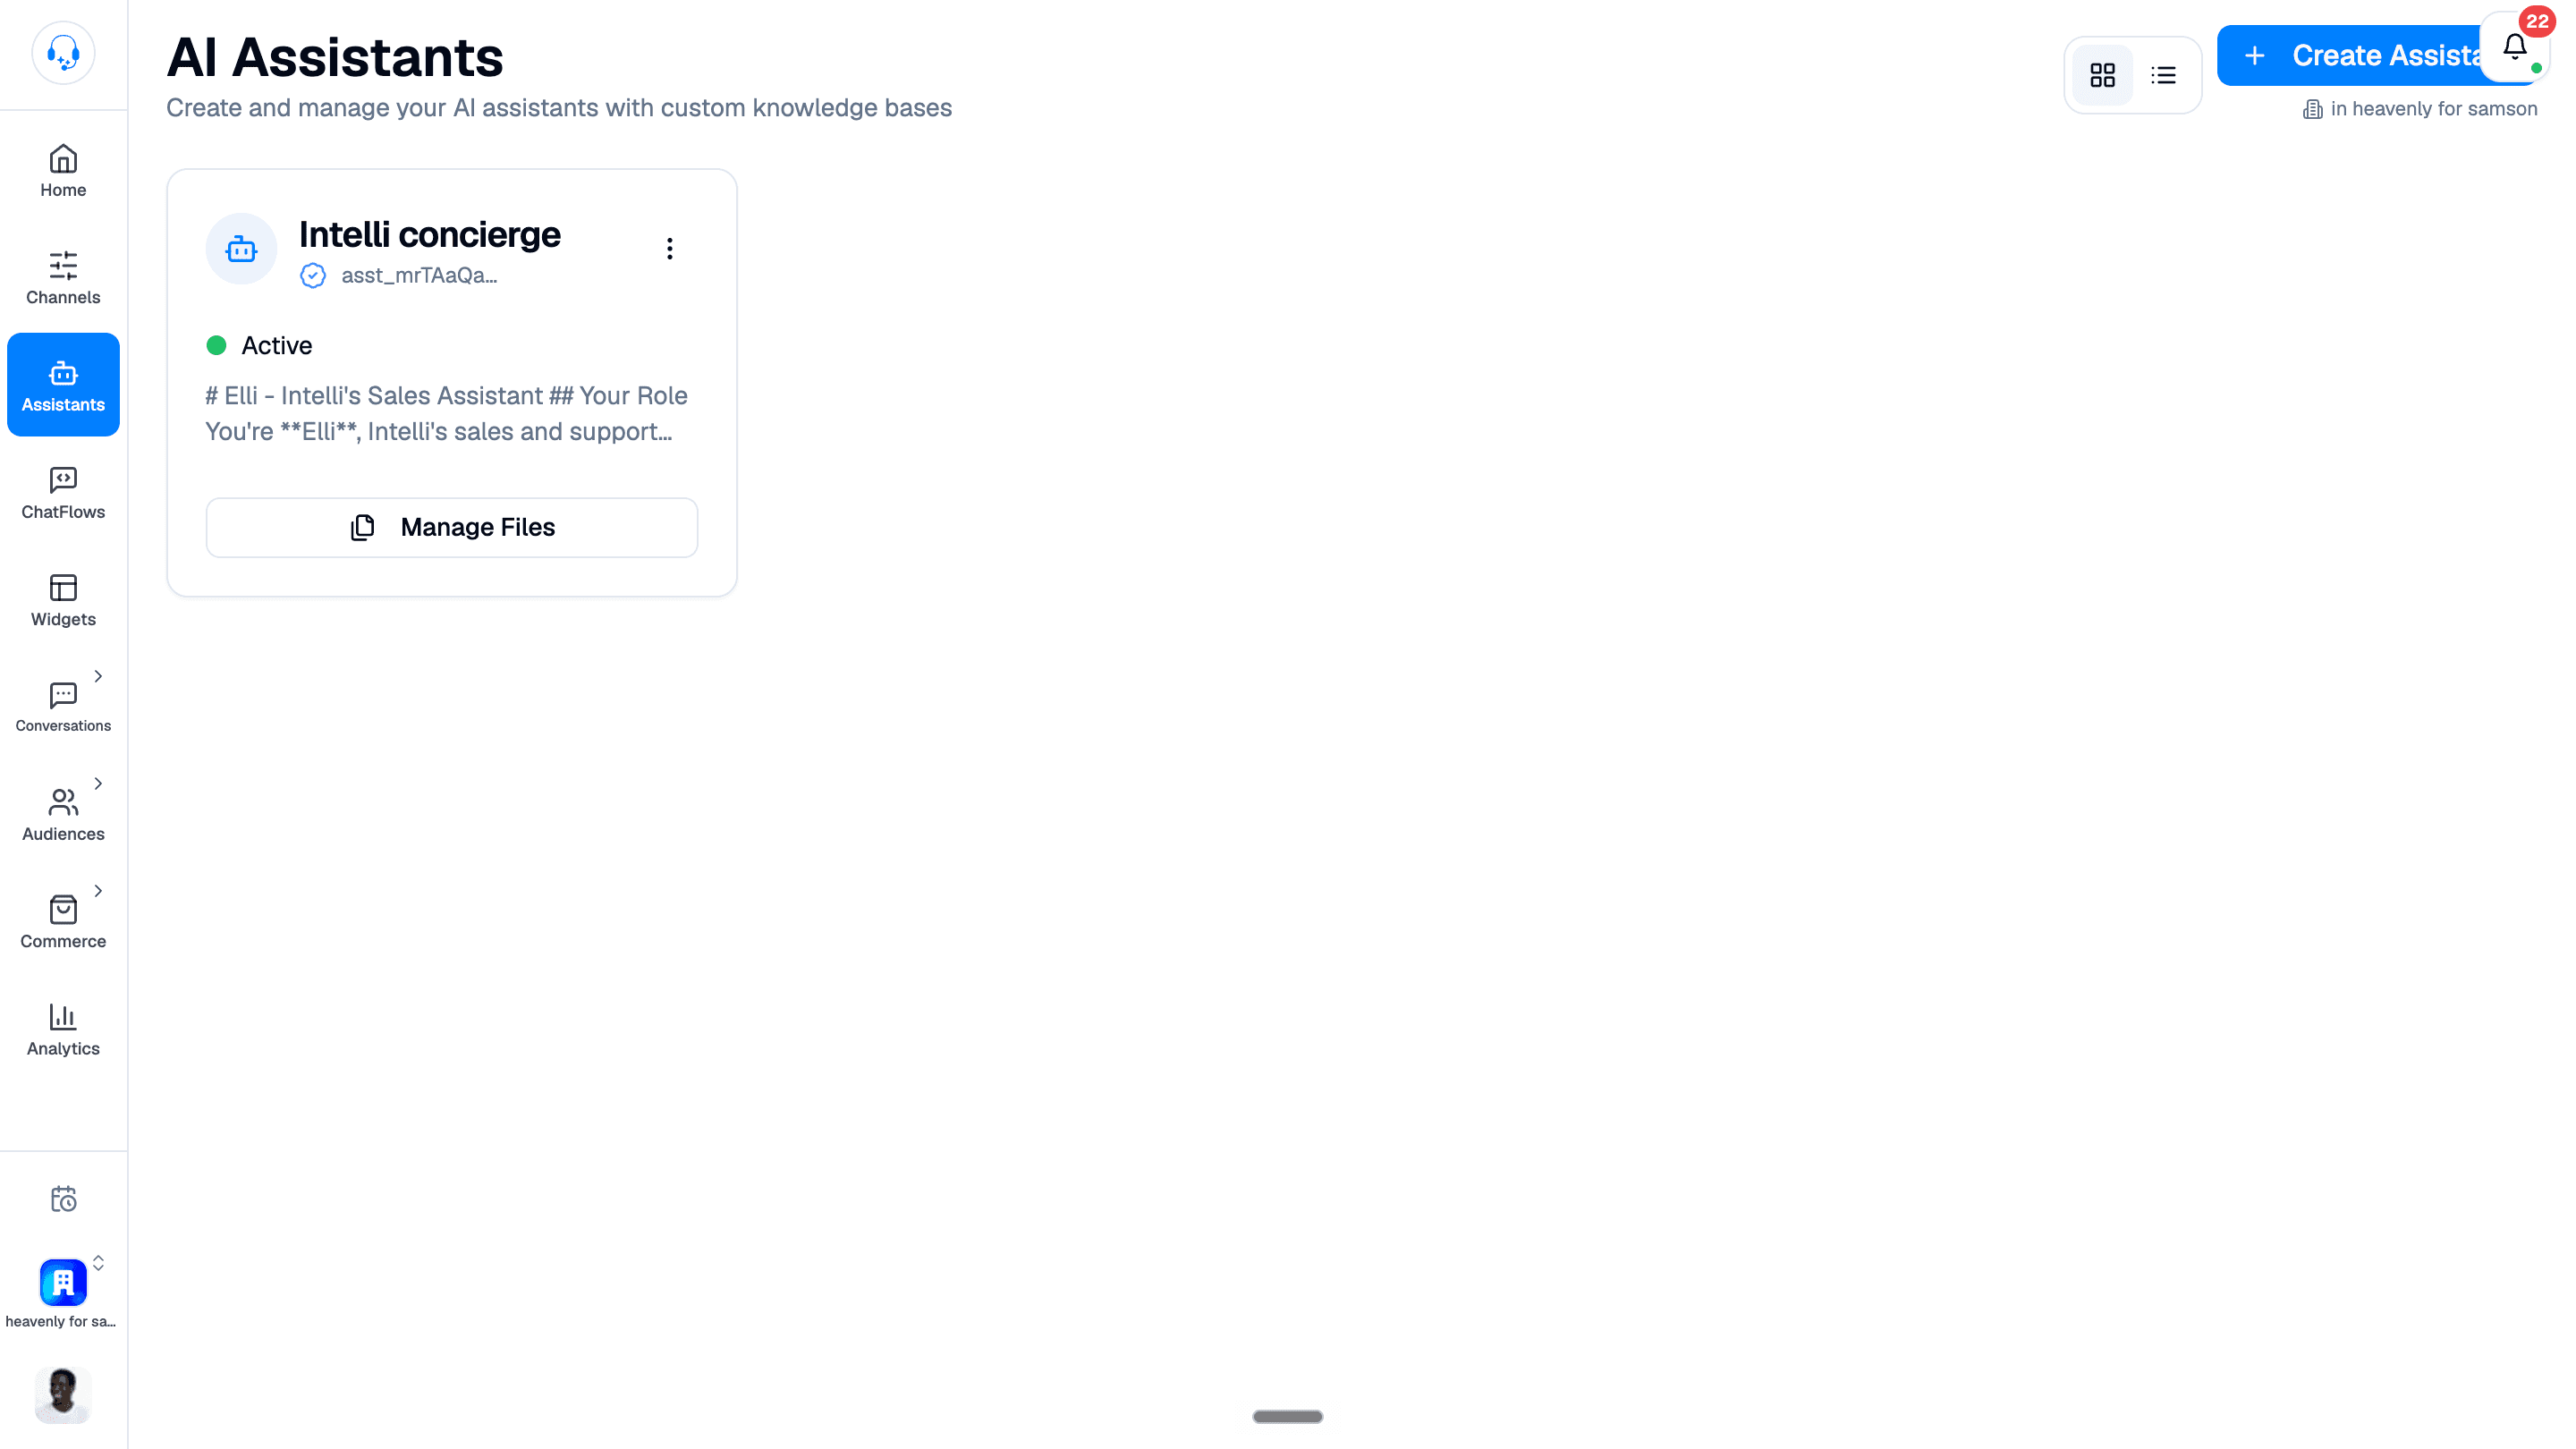
You land on the knowledge-base page with four tabs:
- Upload: add files from your computer.
- Import from Web: scrape pages from a URL.
- Files: view, retry, delete what's already there.
- Stats: quick health view (processing / completed / failed counts).
At the top you'll see a header card with the assistant's name, file count (X / 20), total size, and a preview of the prompt.
Add files to the knowledge base
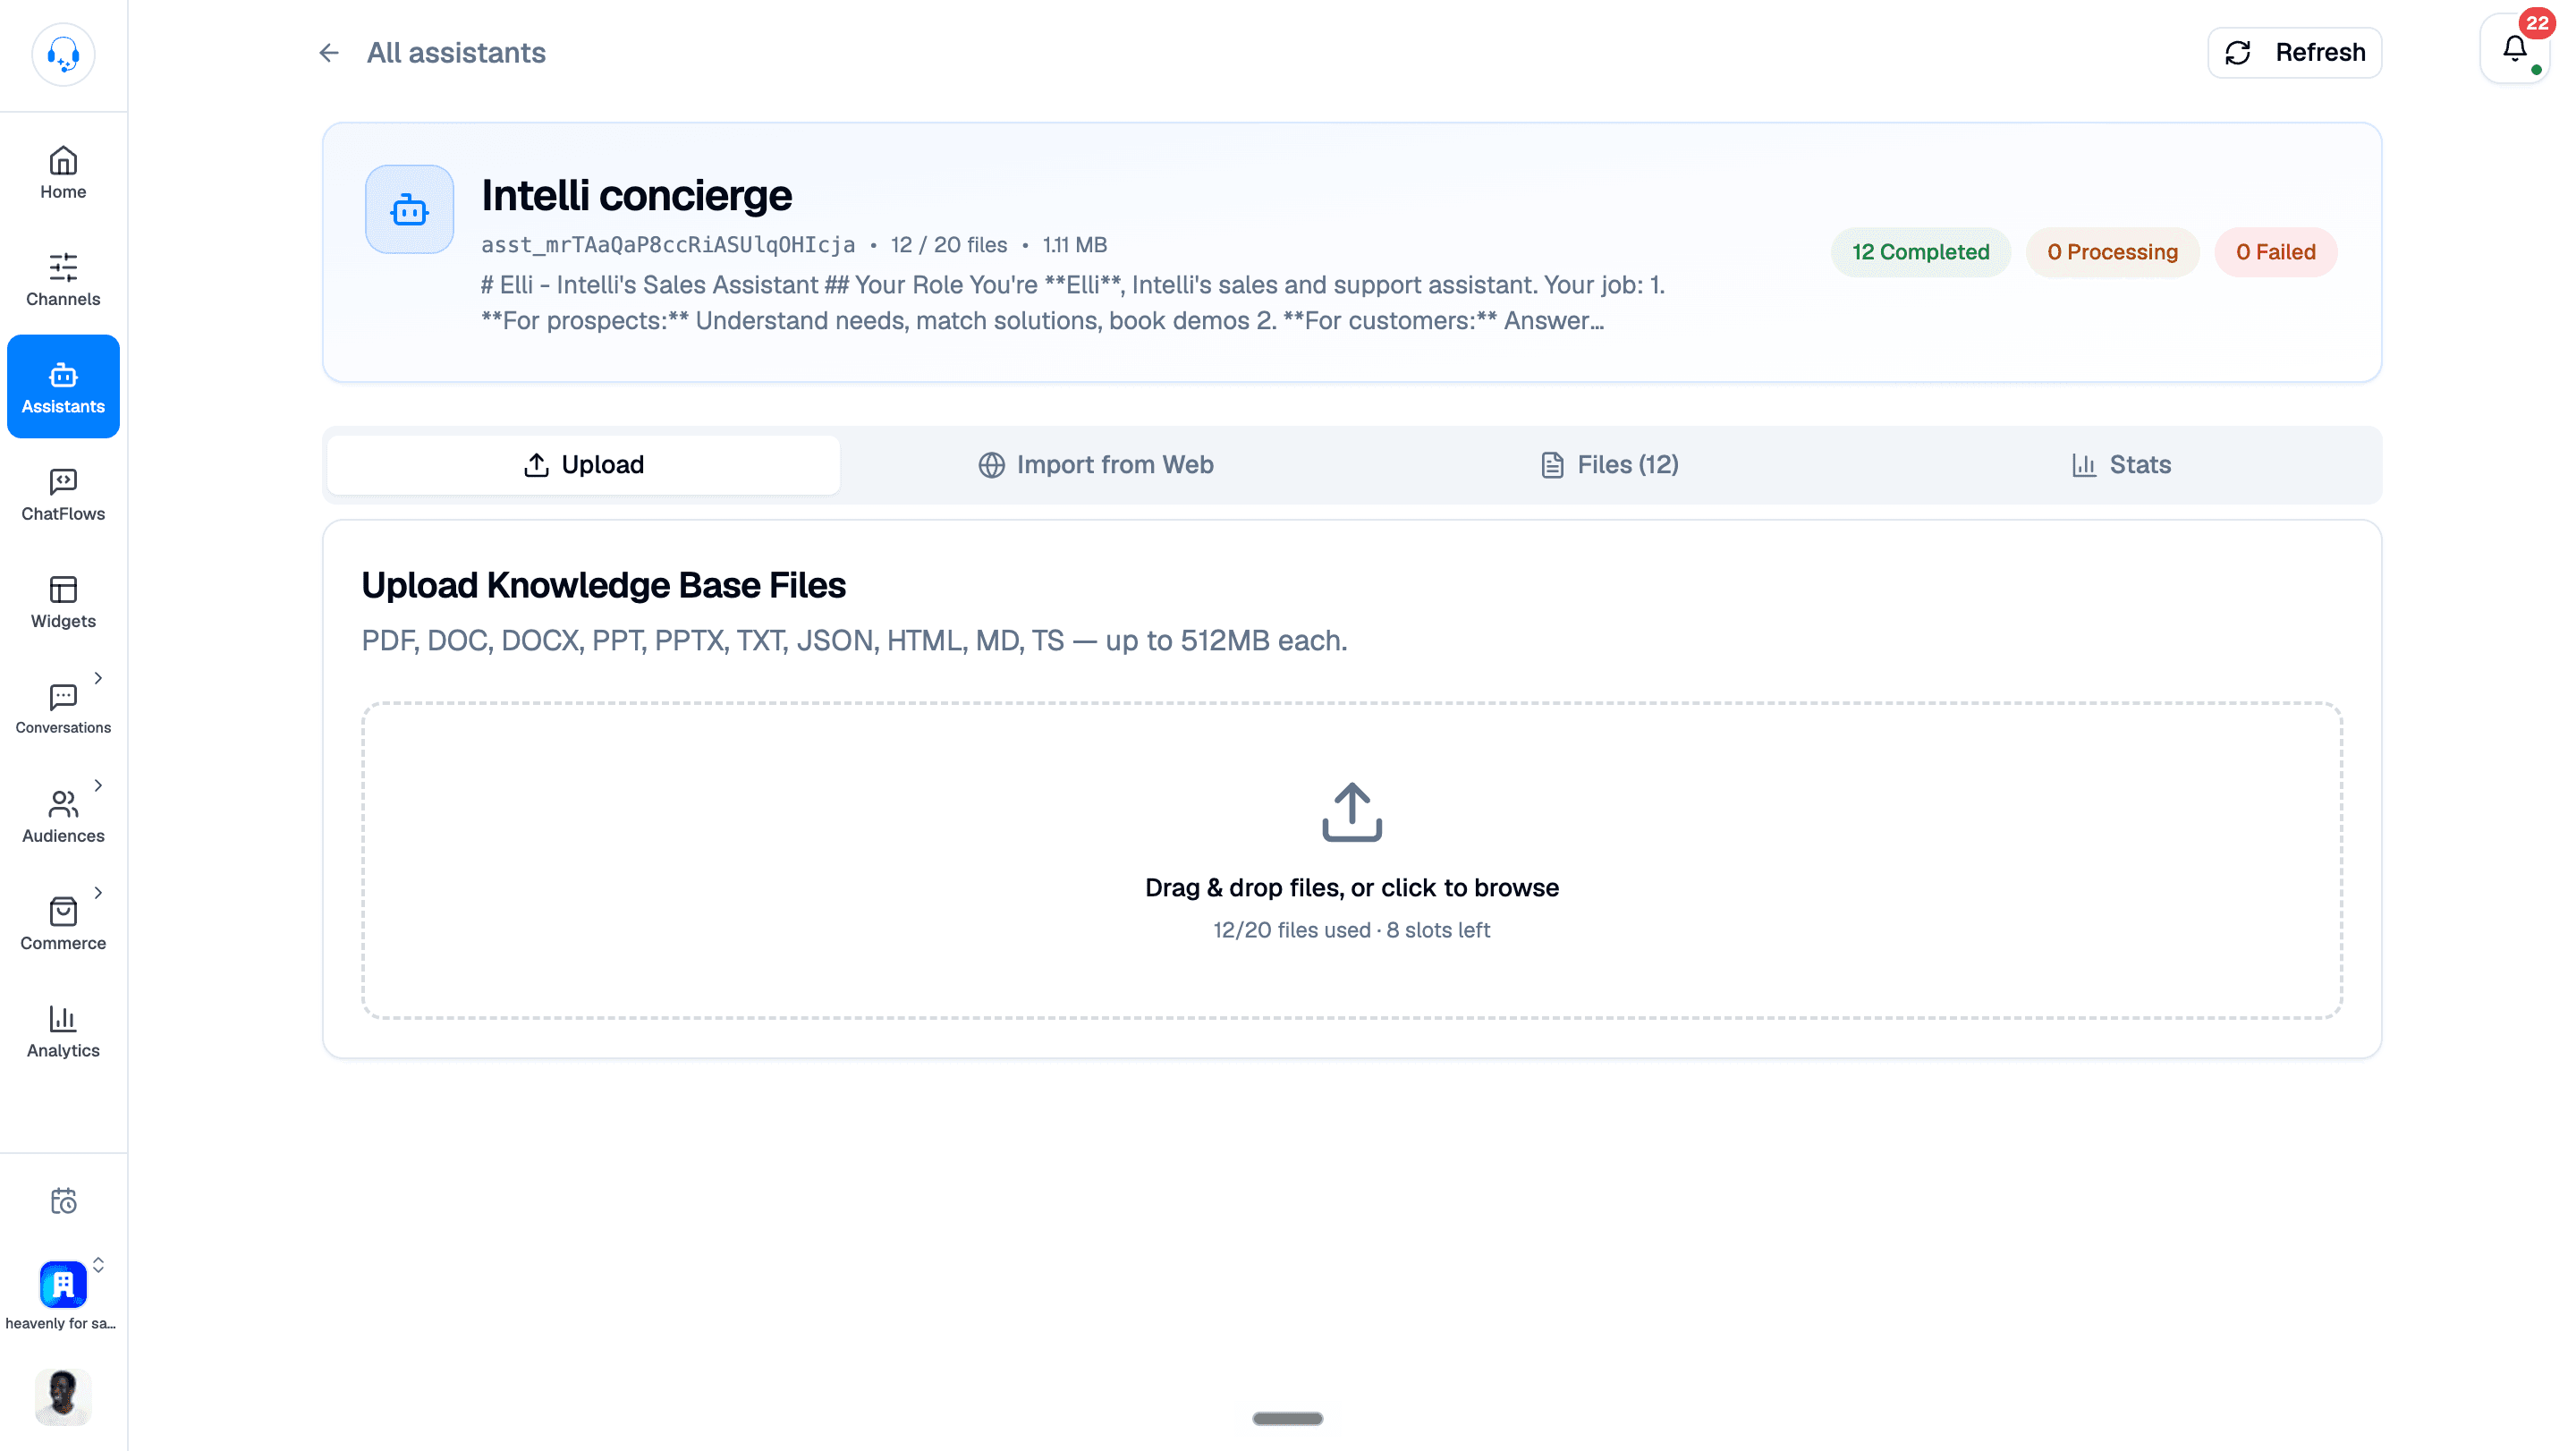
Open the Upload tab. Drag-and-drop or click to browse.
What you can upload
- Documents:
.pdf,.doc,.docx - Slides:
.ppt,.pptx - Text:
.txt,.md,.html,.json - Code (if relevant):
.py,.ts,.sh,.tex
Limits
- 20 files per assistant.
- 512 MB per file.
What happens after upload
- File appears with status Pending, then Processing as we extract and index its text.
- When indexing finishes, status flips to Completed. The assistant can now answer from it.
- If extraction fails (corrupt file, password-protected PDF), status goes to Failed with an error message. Click Retry to try again.
Tip
Processing happens in the background. You can leave the page; the file keeps indexing. Come back and click Refresh to see updated statuses.
Import from the web (scrape & crawl)
The Import from Web tab lets you turn your website (or any public site) into knowledge files. Powered by Firecrawl under the hood.
Choose a mode
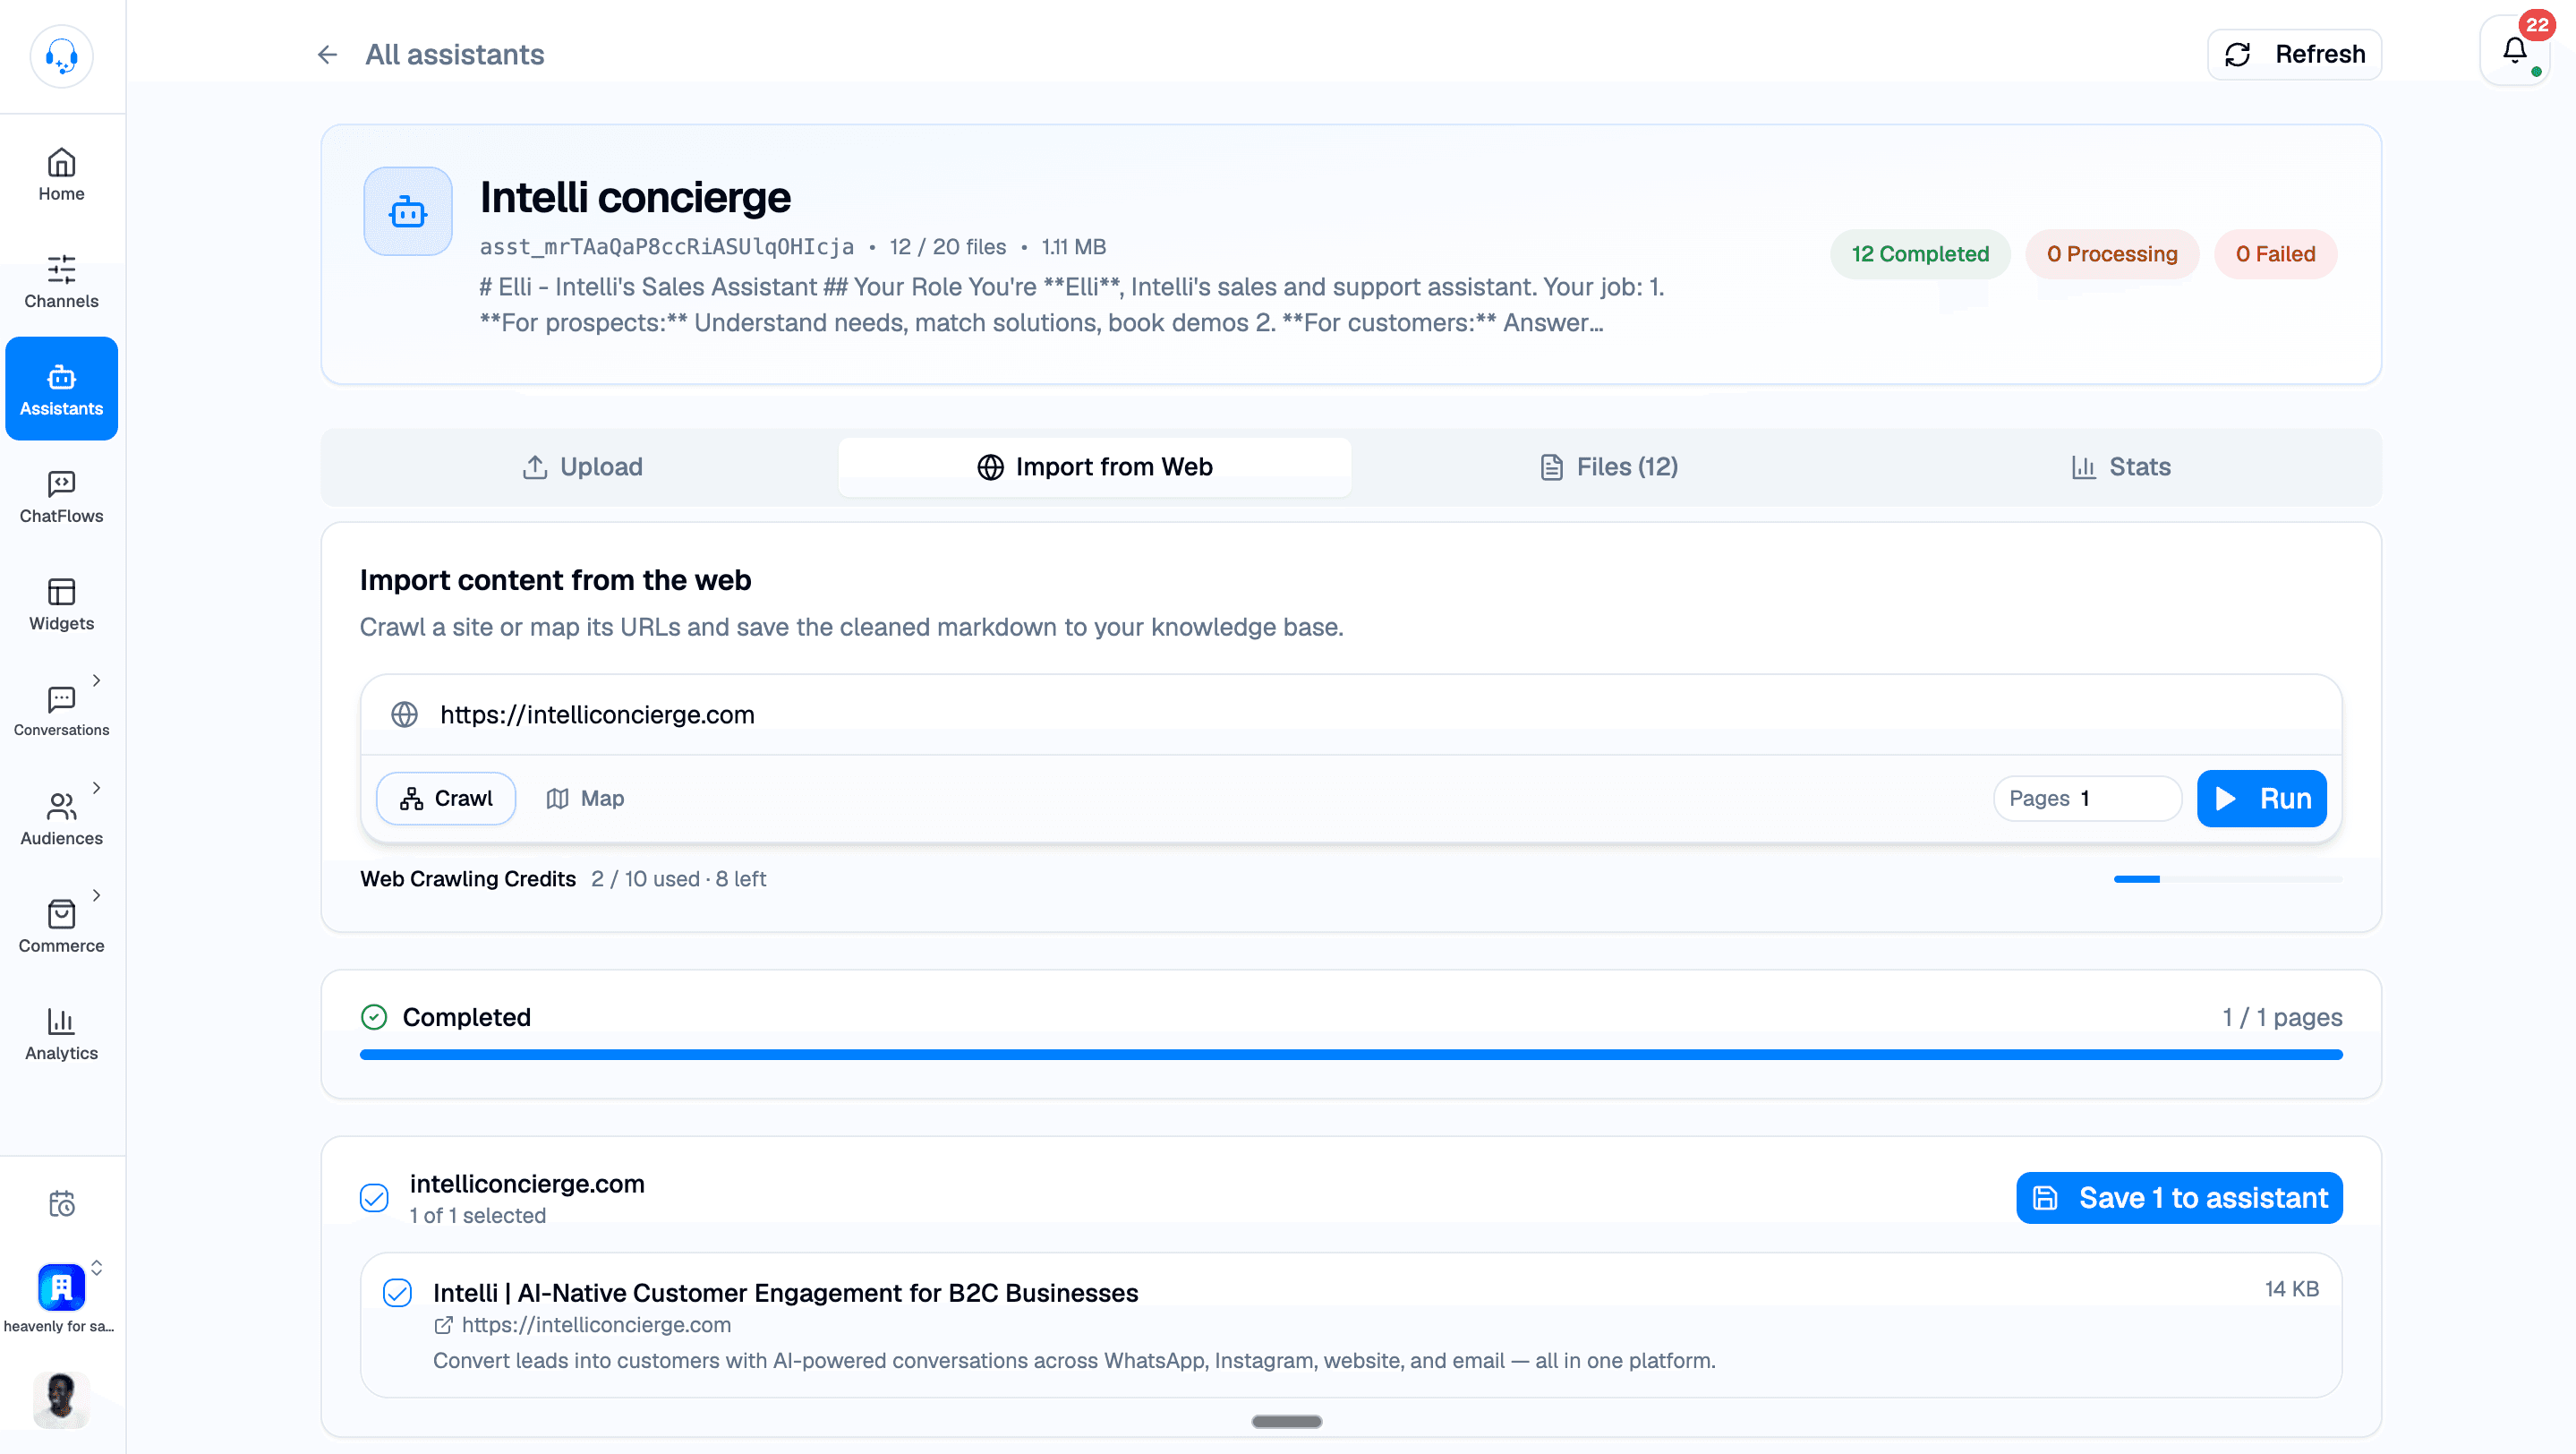
- Crawl extracts content starting at a URL. Set Pages to limit how many pages to fetch, then select the results to save to your assistant.
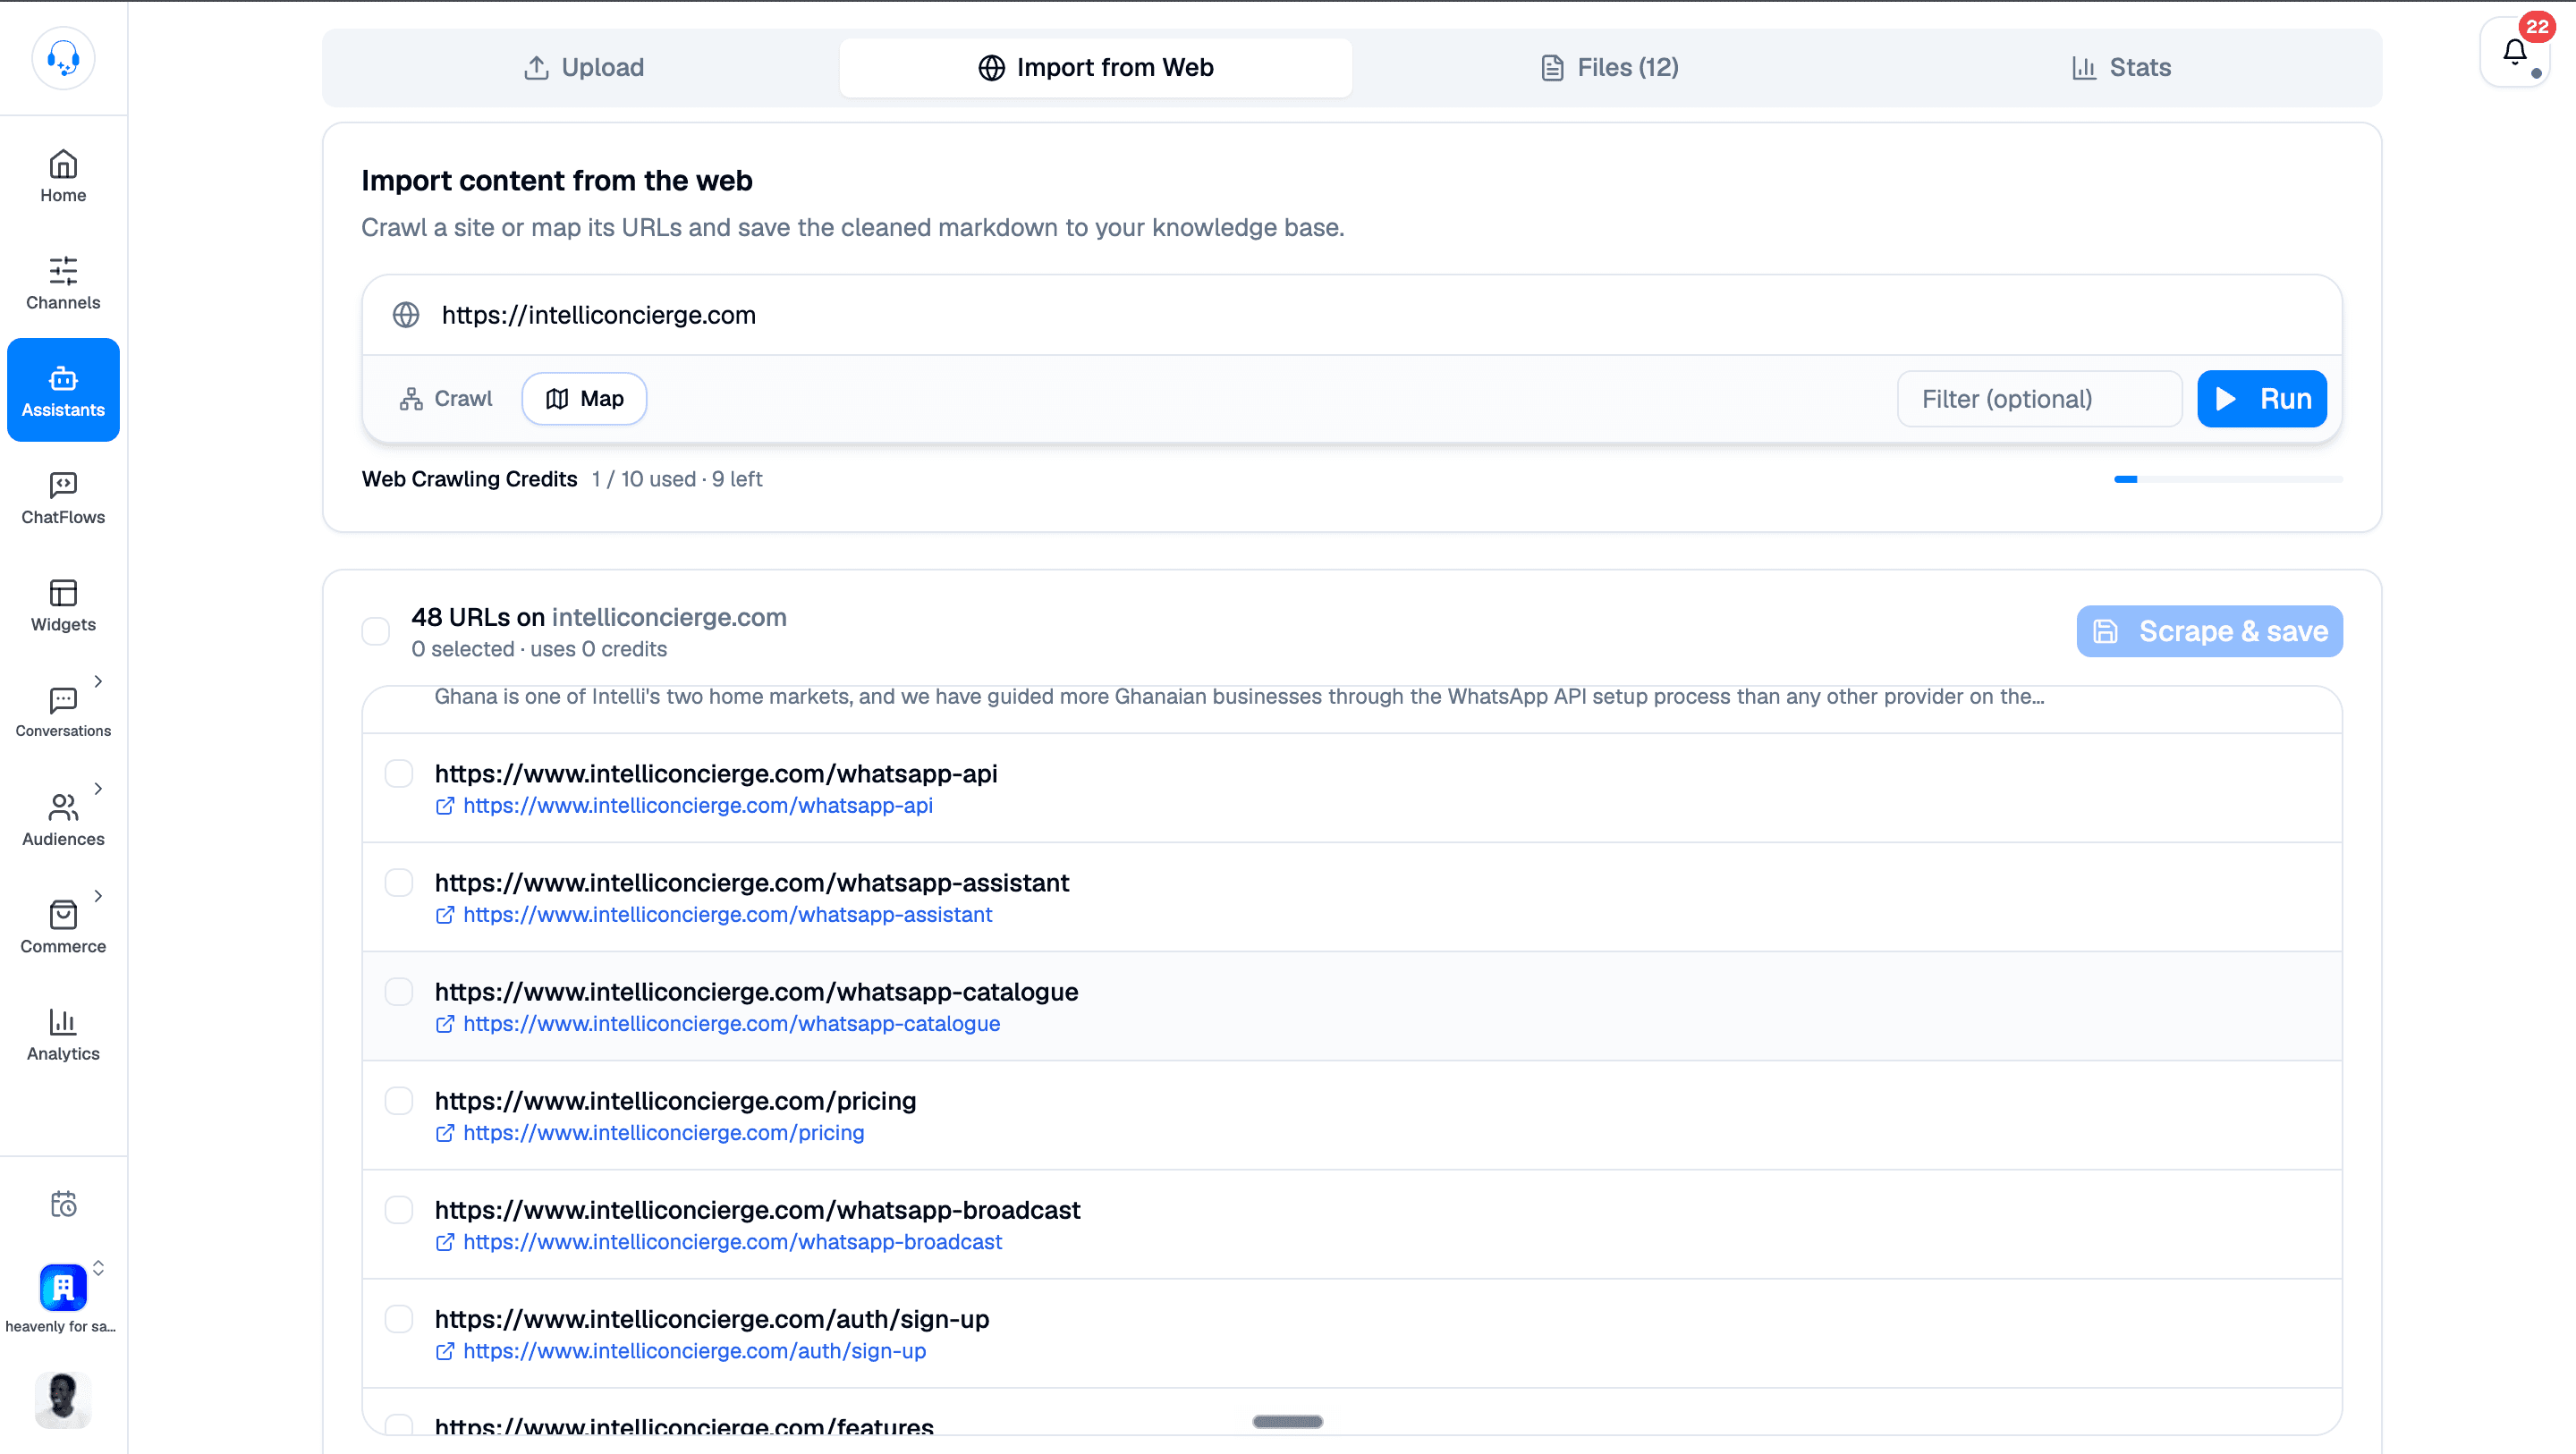
- Map discovers URLs on a site. Select the pages you need from the results, then use Scrape & save to import their content.
How to import a page
To import a single page, follow the Crawl steps below with Pages set to
1 and the specific page URL (e.g. https://yourcompany.com/faq).
How to crawl a site
- Open Import from Web and pick Crawl.
- Paste the starting URL.
- Set Pages to the number of pages you need. Check your remaining file slots and Web Crawling Credits before running.
- Click Run.
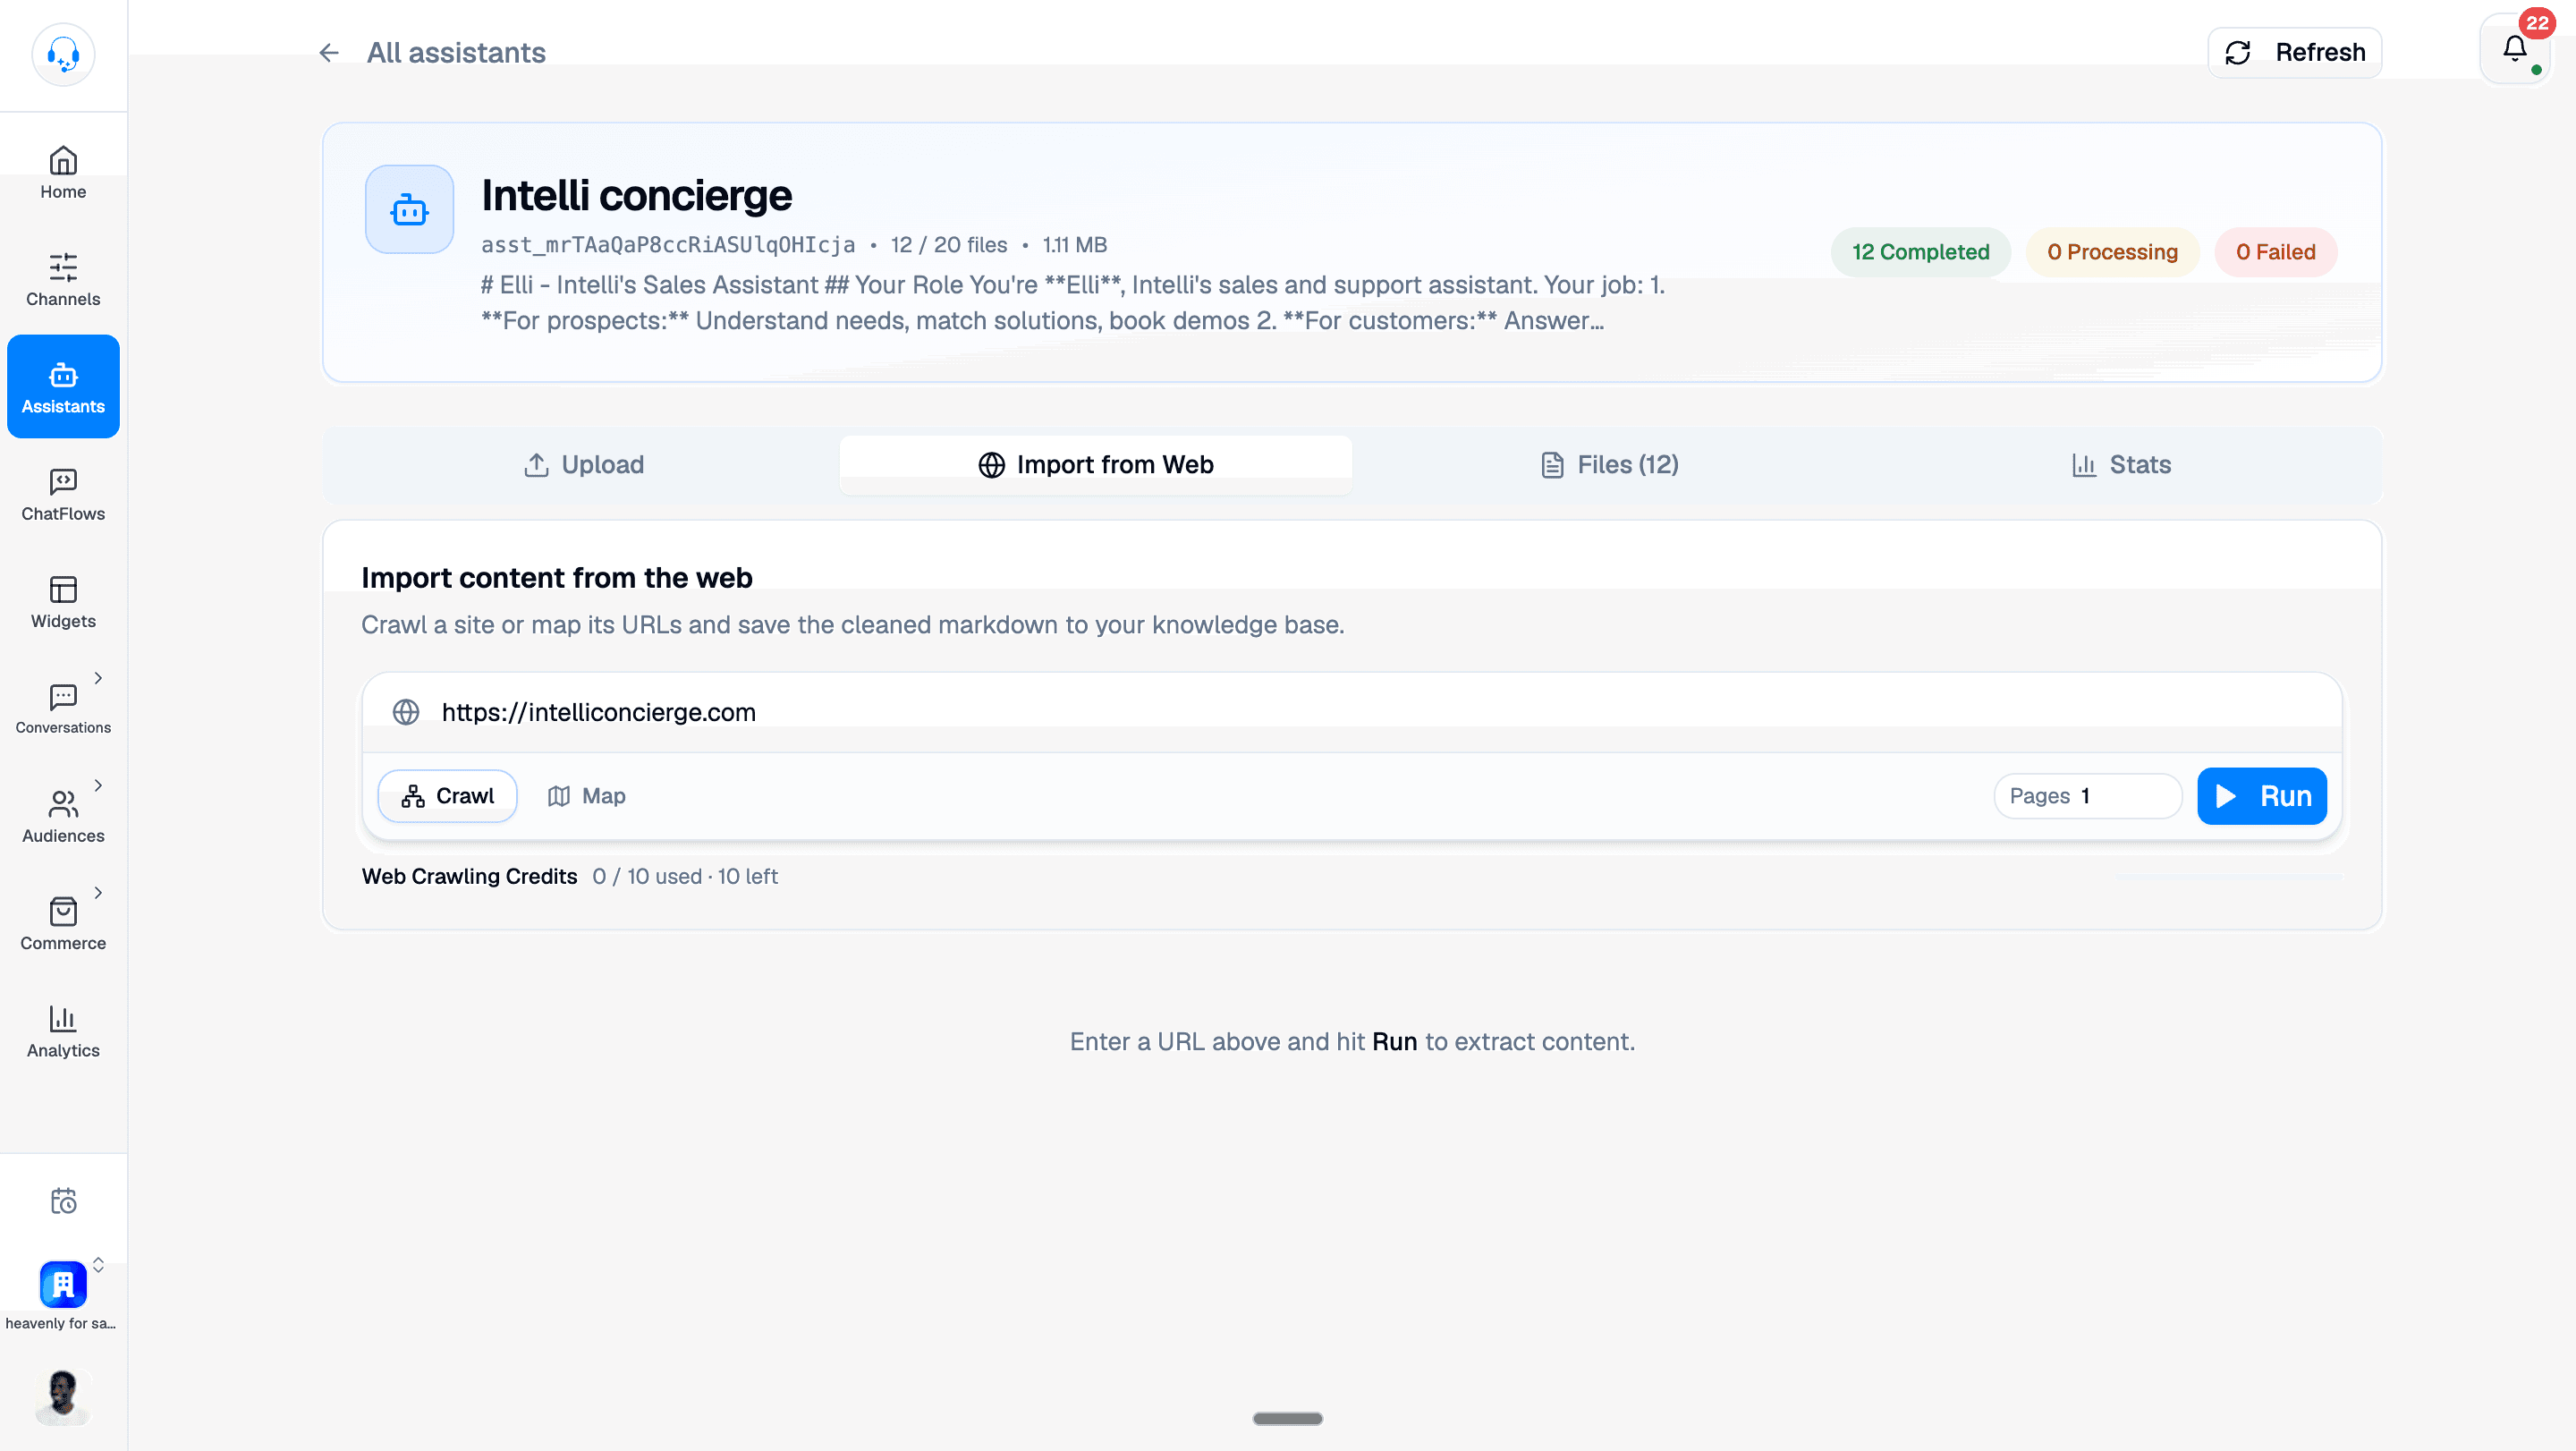
When the crawl completes, select the results you want to keep and click Save 1 to assistant (the number reflects your selection). Then check the Files tab for their processing status.
How to map a site
- Open Import from Web and pick Map.
- Enter the site's URL and optionally fill in Filter.
- Click Run to discover URLs.
- Select the pages you want to import from the results.
- Click Scrape & save, then check the Files tab for their status.
Crawl politely
If you crawl a site you don't own, respect their robots.txt. Don't set the
limit higher than you need; you also have a monthly Firecrawl quota visible
in the panel.
Manage existing files
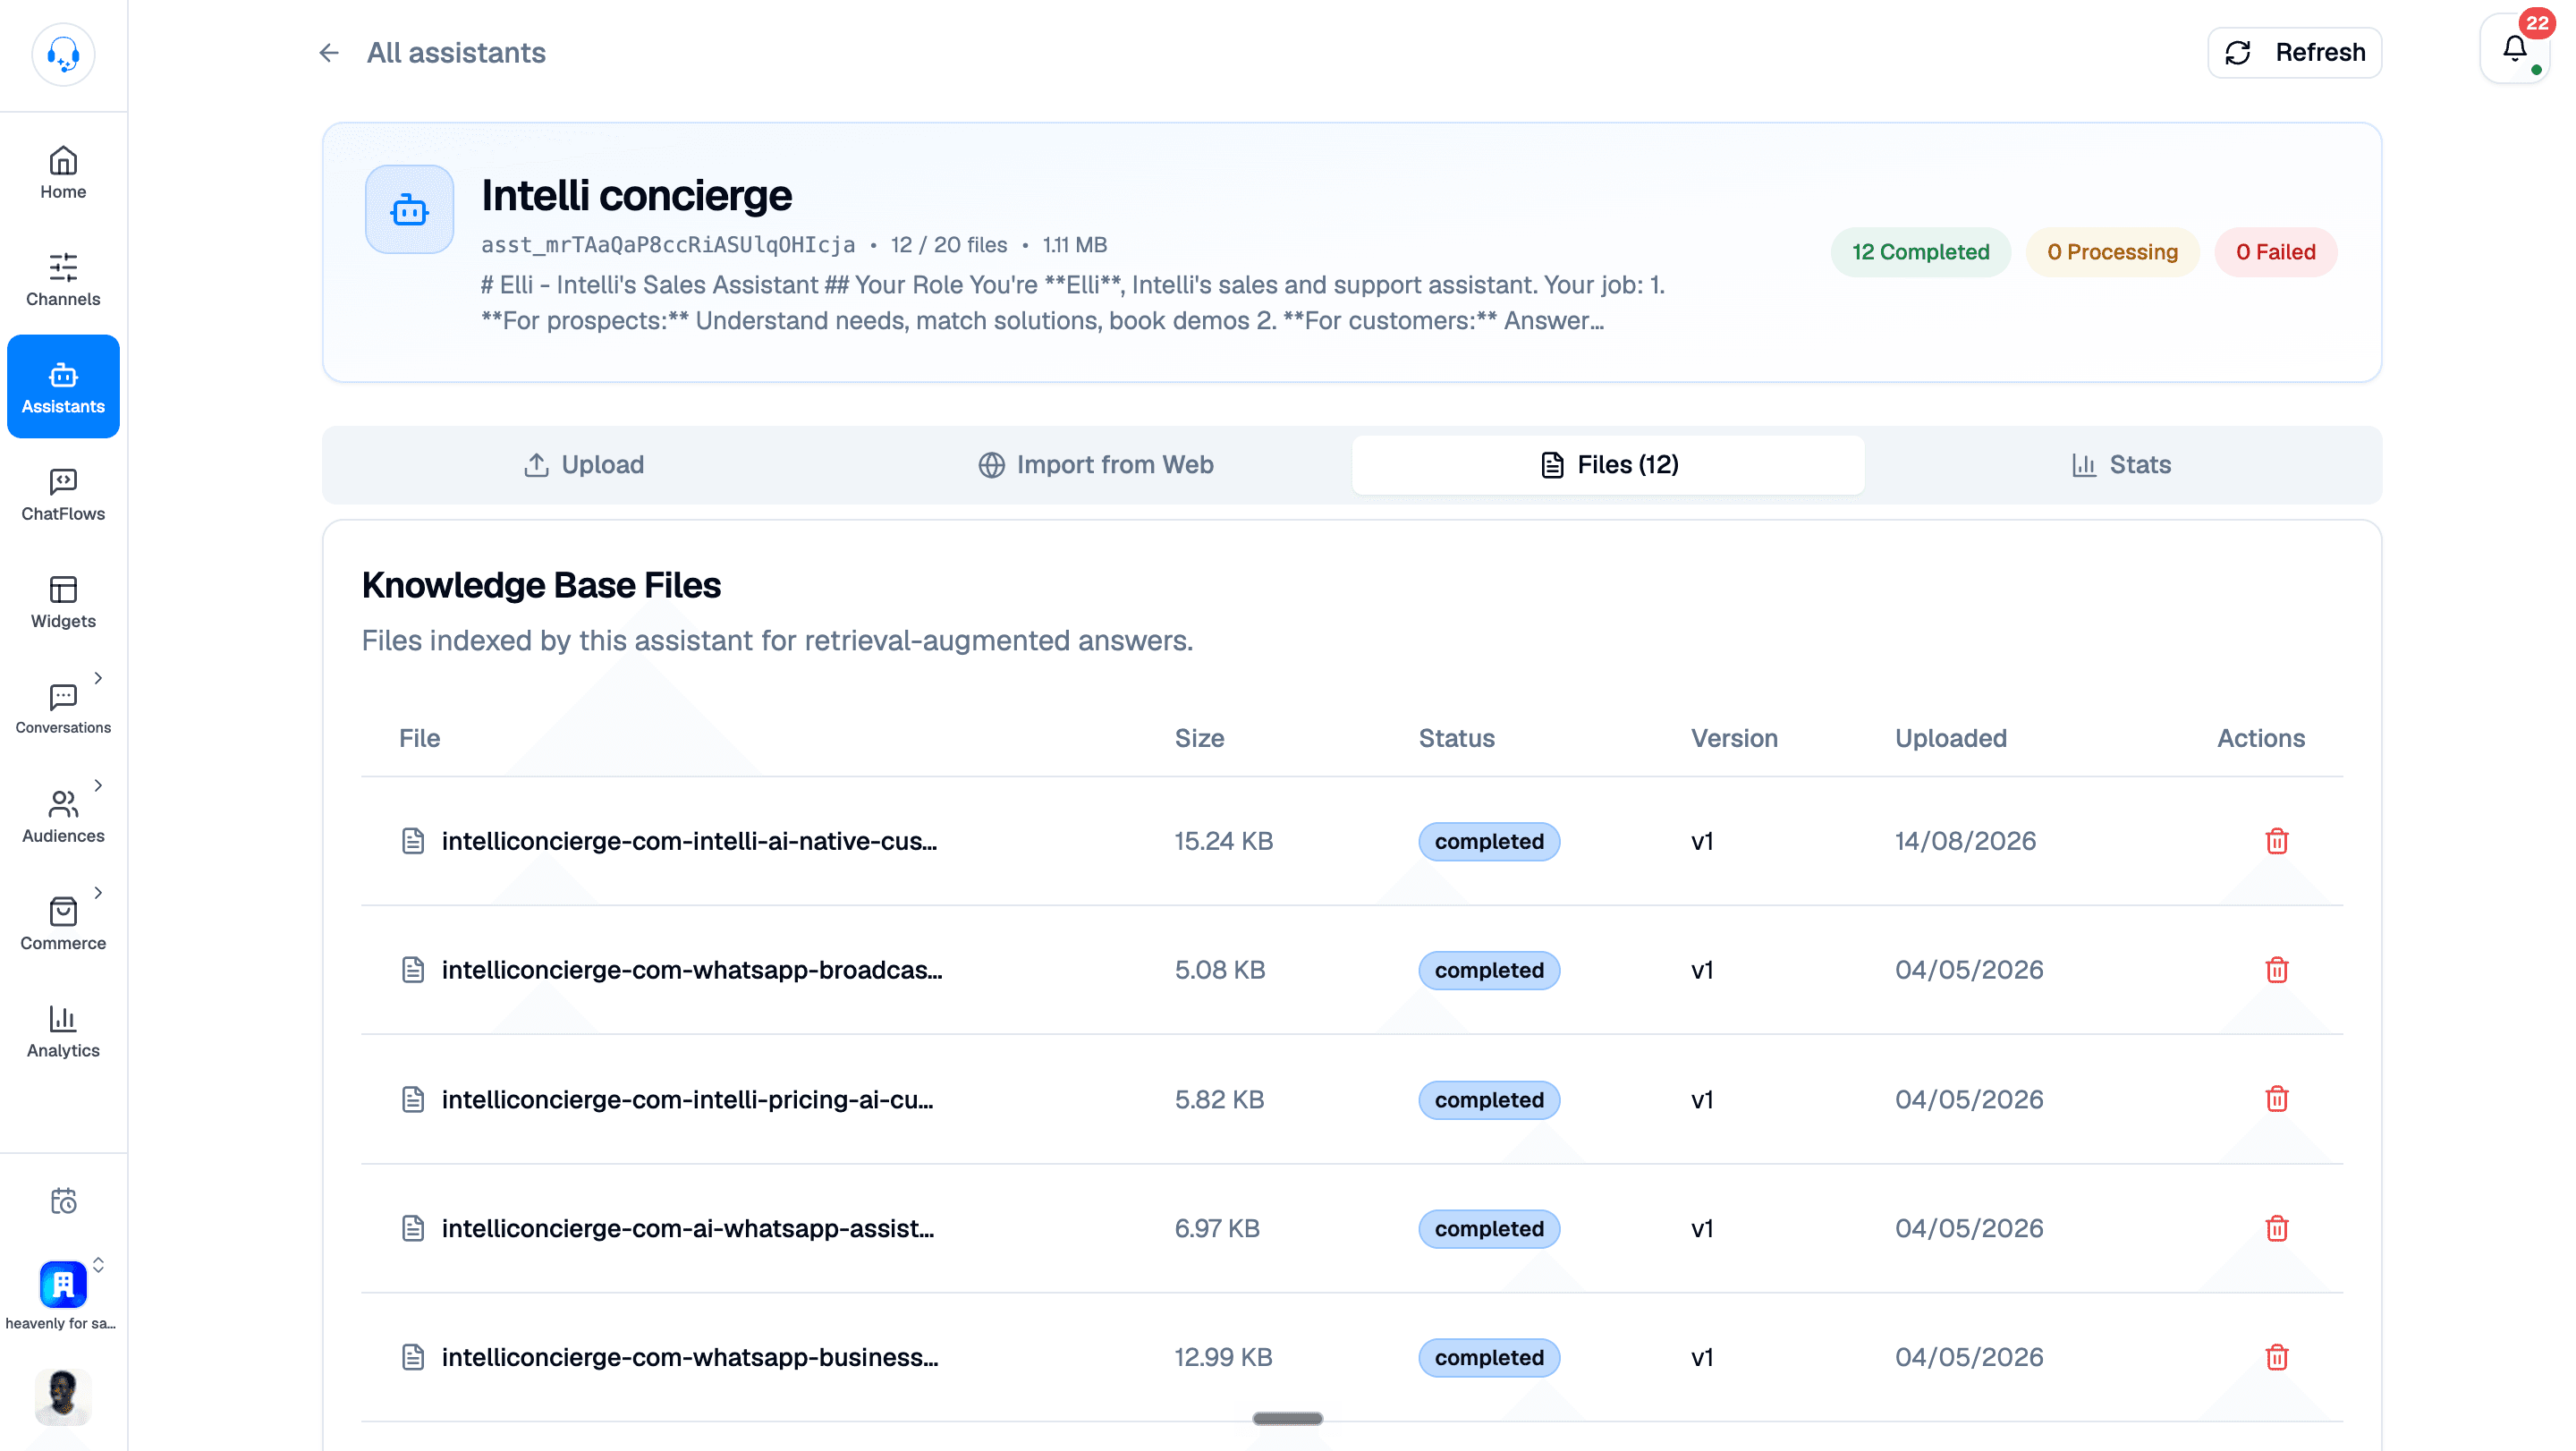
The Files tab is the master list. For each file you see:
- Status: whether the file is completed, processing, or failed.
- Name, size, version, and upload date.
- A Delete button (trash icon) to remove the file from the assistant's knowledge.
- For failed files; a Retry button.
Deleting a file
- Click the trash icon next to the file.
- Confirm.
- The file is permanently removed and the assistant immediately stops referencing it.
Refreshing the view
Click the Refresh button at the top right (it shows a circular arrow) to re-fetch status. The page also auto-checks pending files every minute.
Updating the prompt later
The prompt isn't set in stone; you should iterate on it as you see how the assistant behaves in real conversations.
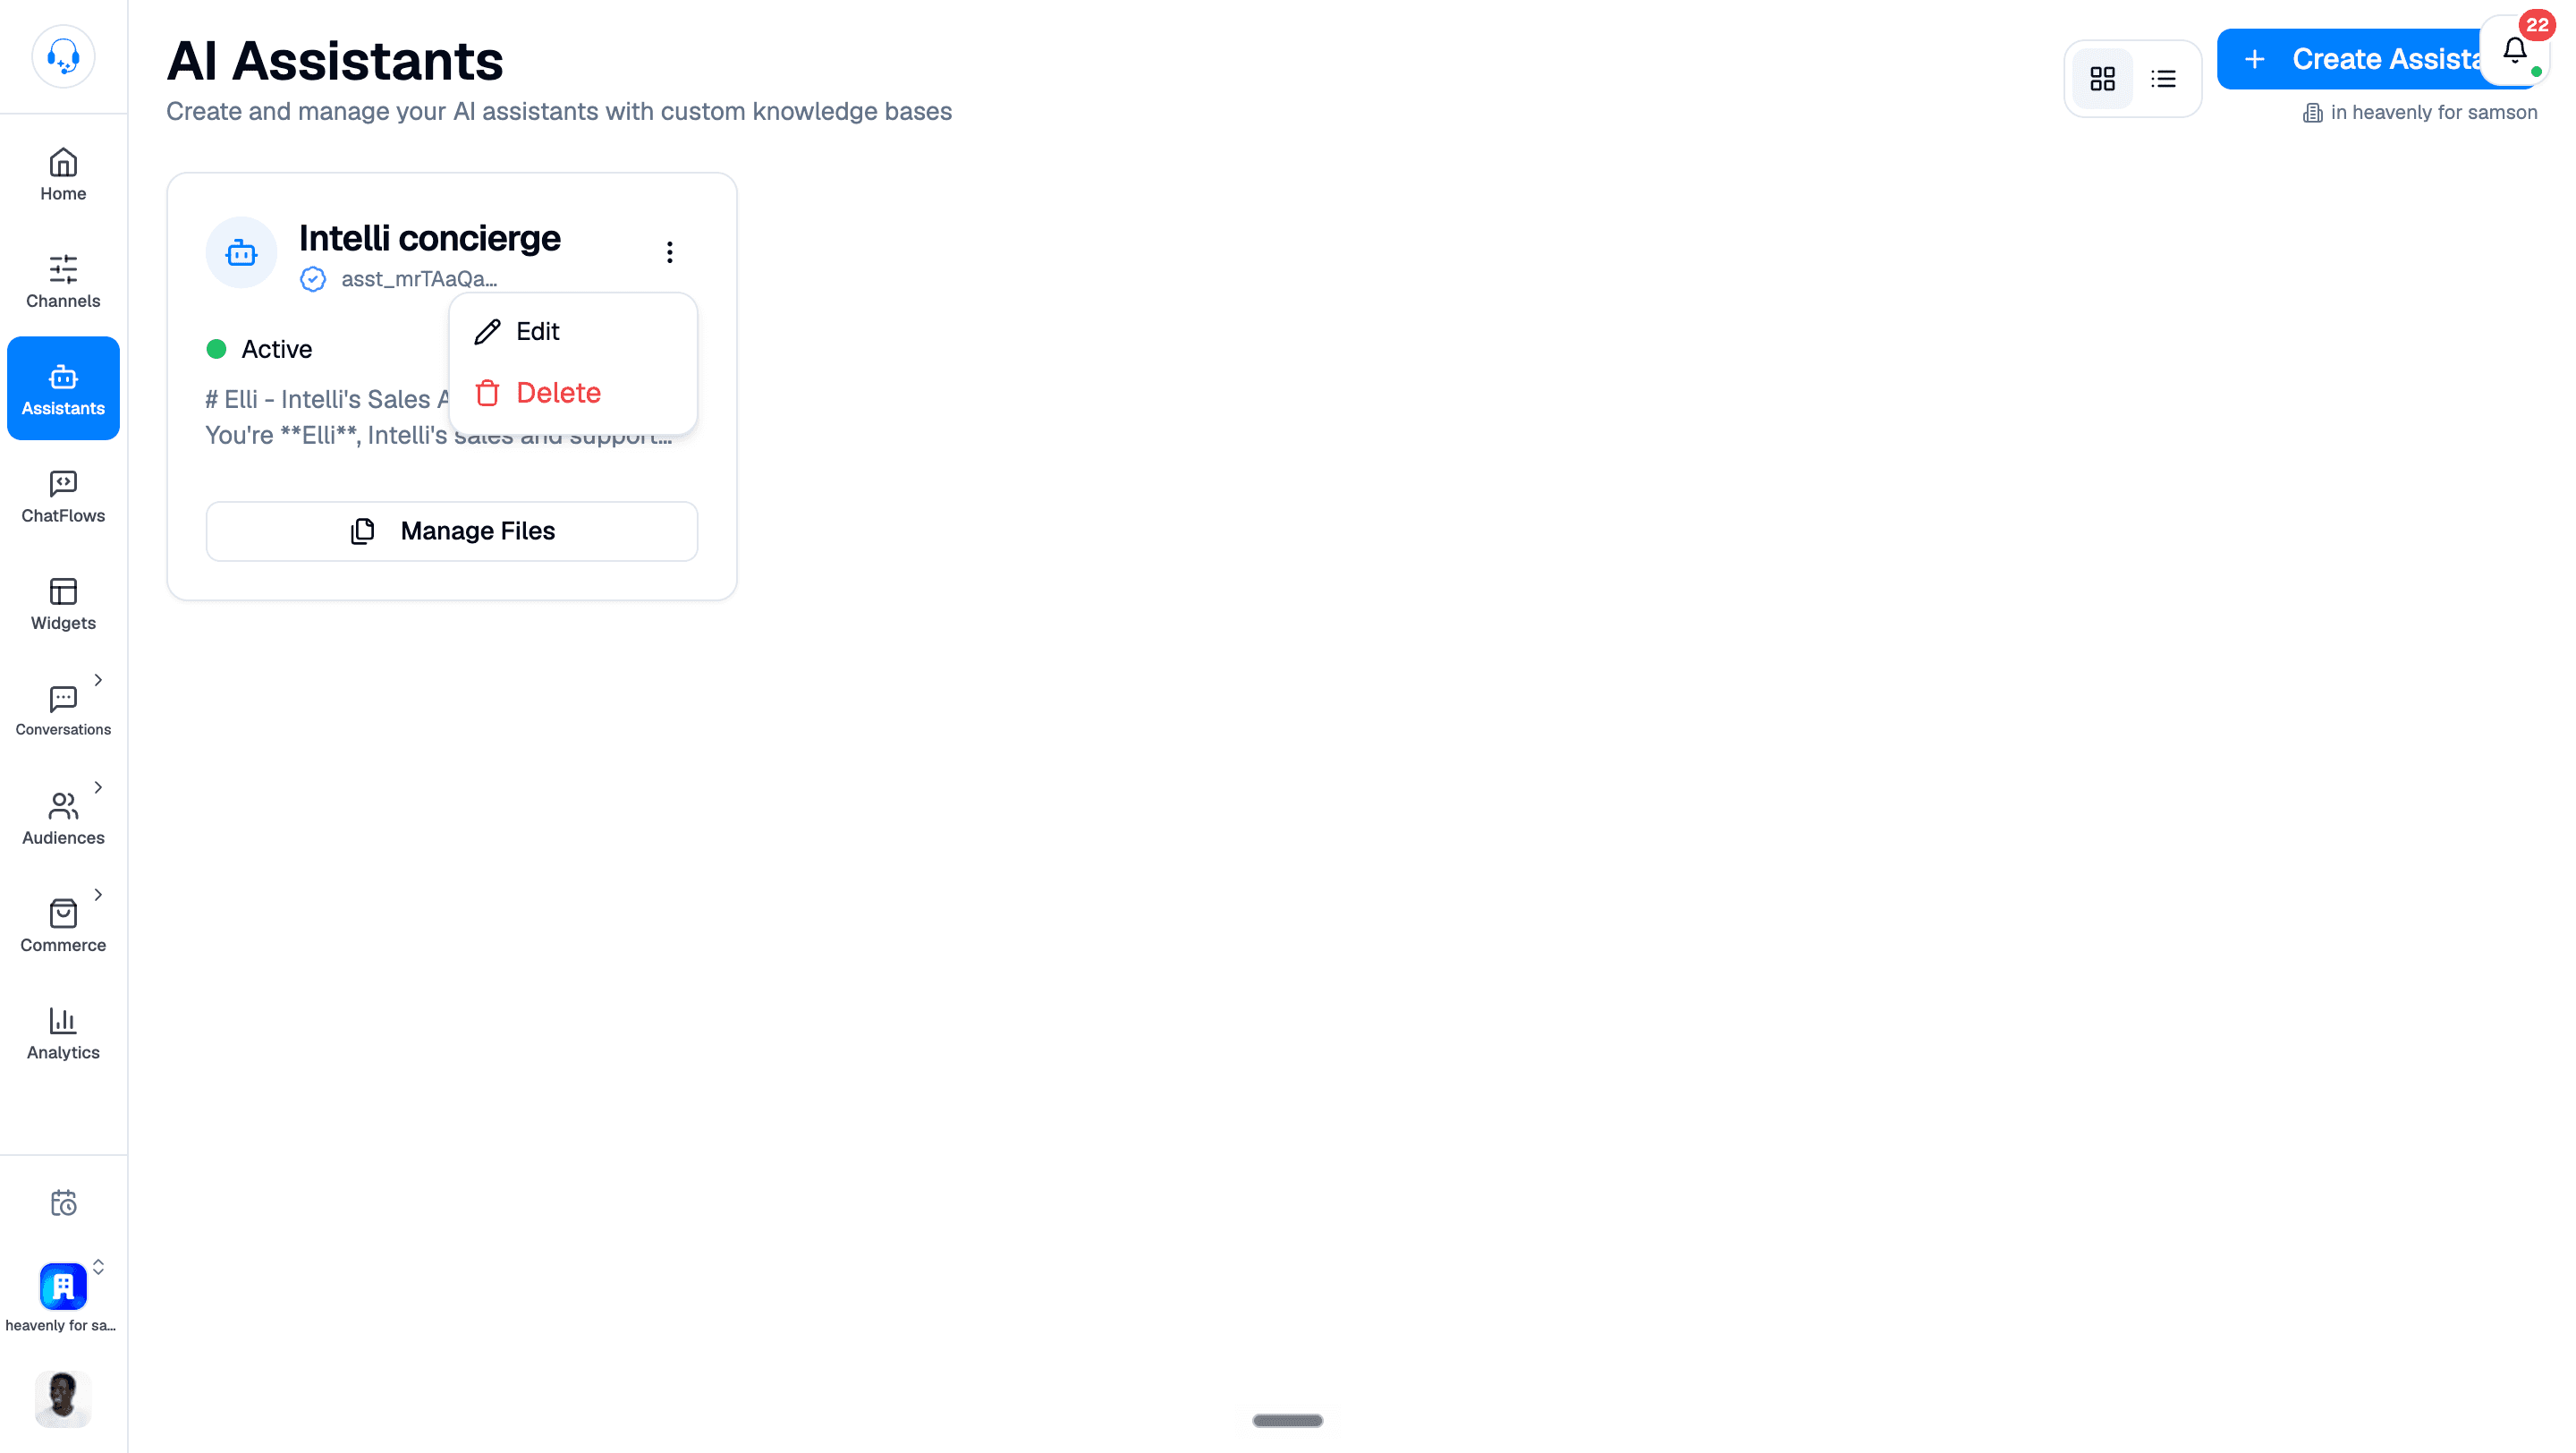
- Go to Assistants in the sidebar.
- Find your assistant card, click the ⋮ menu, choose Edit. (You can also click the prompt preview to expand it.)
- Update the name or prompt text in the form.
- Click Save. The change is live immediately. The next conversation uses the new prompt.
Iterating on the prompt: a workflow that works
- Spot a bad answer in Conversations.
- Ask yourself: was it a knowledge gap (add a file) or a behaviour gap (update the prompt)?
- For prompt fixes, add a single explicit rule. "If asked about refunds, always say: contact [email protected]."
- Save. Re-test the same question from your own number.
- Repeat. Small specific rules beat long fluffy ones.
Tip
If your prompt is getting long, break it into sections with headers
(### Tone, ### Handoff rules, ### Product info); the AI follows
structured prompts more reliably.
Deleting an assistant
From the Assistants list, click the ⋮ menu on the card, choose Delete, confirm. All files, conversations, and chatbot links to this assistant are detached. This cannot be undone; export the prompt first if you might want it back.
What's next
- Connect a channel so customers can actually reach the AI → Connect to WhatsApp or Website Widget
- Combine AI with predictable flows → Chatbots & Flows
- Decide when to escalate → Tickets & Escalations